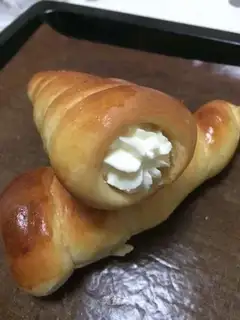
Cough bread
By VicentaLakin
Recipe Recommendations
- high-gluten flour 300g
- solenoid of 3
- hard paperboard 1 bunk
- tin foil appropriate amount
- fine sugar 62g
- milk 90g
- light cream 100g
- egg white
- Rapid yeast powder 4g
- salt 3.5G
- egg liquid a tablespoon
- rum 5ml
- sweetening
- baking
- half an hour
- ordinary
Steps for Cough bread
1
Get the hard cardboard or the A4 piece of paper ready, as you wish, to cut the square first. I'm doing 10 cm in the bottom, 14 cm in the length, so the rectangular size is 10 *14, so it's a little bit easier. It then selects a short mid-point of 10 cm length to make an equivalent waist triangle with two ends of the parallel side。2
When the print is folded, a triangle is cut。3
Rolling up triangles, two parallel waist edges, glued with transparent glue。4
At the bottom, if there is an excess, it can be folded in and it also acts as a fixed function, with tin paper wrapped in it, and the screws ready。5
When all the material of the Chinese noodles is mixed, it is smoothed into a smooth, wet, warm, fermented to three to four times the size of the surface, and when it is torn apart, it is visible that there is a very flat and thin beehive tissue。6
Tore small pieces of Chinese noodles, even with other materials in the main one, and swung them to the extension stage, both to remove thicker film and to pierce the edges of the film and to present sawn teeth。7
The main noodle is slightly rounded, covered with a protective film, and room temperature is loose for 30 minutes。8
at the end of the laxity, the air is ventilated and split into 12 small noodles, with a protective film on the back of the roll, and room temperature is loose for 15 minutes. every little noodle weighs about 50 g。9
(c) Take a loose, small face group, which will first be elliptical, which will turn its face over, press the bottom of the thin, and roll from top to bottom into a cylinder。10
operate all the little noodles, start with the first one, and grow the cylindrical strips about 45-50 cm long。11
from a distance of about 2-3 cm at the tip of the screw, the face rolls are placed on the screws, and at the end, be careful to tighten the bottom closing。12
Bread embryos are placed on grilled grills, in warm and wet places, and are re-fermented。13
Some 20-30 minutes later, the volume of bread embryos increased significantly. Preheat oven 190 degrees. After the preheating has ended, a thin layer of egg fluid is painted on the flat surface of the bread embryo。14
The oven is sent into a pre-heated oven, mid-level, upper-fire, 180 degrees, baked for 12-15 minutes, to swell, yellow on the surface and smell. When the bake is finished, the oven will be out of the oven and it will be cold on the drying web。15
Hang on, spin the screws, take off the mold。16
The light cream is accompanied by rum and fine sugar and is distributed to 9, i.e., tilted to the egg basin, and the cream does not flow。17
Filled with cream from the bottom of the bread, which can be eaten。Cough bread Make Tips
I personally felt that a little hard paper would be better when the screwwork was made, and it was more stylish. If not, the A4 paper will also be available; 2. This pasta, when smoothed, is almost complete; and 3. The laxity of the noodles will have to be adjusted to the actual situation. The higher the temperature, the time can be reduced appropriately; 4. When the face is lengthened, if it is felt to be resilient and difficult to stretch, it can be left loose and continue to operate the next one. I think we'll be relieved once we're done. 5. When entanglementing the noodle, care is taken that: 1. From a distance of about 3 cm to the top of the bolt, the cat and dog fermentation may occur; 2. During the entanglement, the latter spiral must crush the previous spiral, so that the thread is clear; 3. When entangled to the end, the noodle can be pressed thinly and squeezed; 6.2 rounds should not be too long to affect the stripes of bread. I'm about 25 degrees in the room, 30 minutes. If the temperature is higher, the time should be reduced appropriately; 7. The egg fluid painted on the surface should preferably be sifted and colourd more evenly. If you use egg yolk, you need some fresh water, or you'll get too dark. In addition, care is taken not to pierce the surface of bread embryos; 8. The specific bake time and temperature will have to be adjusted to the actual situation in the ovens; 9. After the bake has ended, the oven will have to be demersalized and transferred to the drying web so as not to produce water vapour at the bottom; and 10. The bread will have to wait until it is cooled before removing the bolts, otherwise they will be easily deformed. When removing the bolt, you can squeeze the bottom of the bolt (only for homemade tubes) to the right and right, and then rotate it a few times, and you can remove it. It's normal to have some bread crumbs on the bolt。