Recently, I saw sesame potato buns on the Internet. The white ones were really cute ~ so I wanted to try them out.
However, I don't have the sesame bread premix flour in the formula, and I don't know the formula of that flour.
Fortunately, I saw a recipe for a "cute bread little face" online, which was also a very cute snack that was steamed.
I think the bread should be baked, and the steamed bread always feels like steamed buns and steamed cakes. So I referred to the formula of the little man's face and the formula of the sweet potato bun to make glutinous rice cakes + muffin bread.
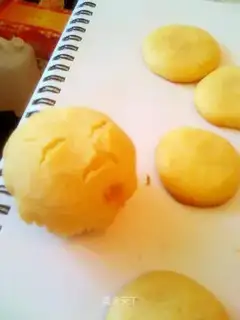
Why glutinous rice cakes? Because I really don't know how to squeeze a ball out of a decoration bag... So he used a spoon to scoop it into the shape of a small cake. But this small cake is not hard. It tastes a bit like a muffin and has a little QQ flavor. It is quite delicious.
Because my oven was too small, there was still a lot of batter left after baking a plate of small cakes (about 20 pieces), so I put in 3 more muffin paper cups and baked glutinous rice muffin bread-very soft, very Q, and delicious.
Glutinous rice cakes + glutinous rice muffin bread
Recipe Recommendations
- glutinous rice flour 2 tablespoons
- eggs one
- starch 4 and 1/2 tablespoons
- yeast 1/2 tsp of
- white sugar 5 tablespoons
- milk 100ml
- salad oil 4 tablespoons
- vanilla powder 1 tsp
Steps for Glutinous rice cakes + glutinous rice muffin bread
1
Pour self-made flour, starch, glutinous rice flour, white sugar, and vanilla powder into a large iron basin and mix well. Better sift. The white sugar grains I used were thicker, so I didn't sift the sugar, but the other powders were sifted.2
Put the milk in the microwave oven, bite it for 30 seconds, take it out. Leave it before it is hot. Pour in the yeast, stir it to dissolve the yeast into the milk, and then put the milk aside.3
Beat the eggs into the powder pile and mix well with a blender.4
Pour the milk into the flour pile in 3 - 4 times, stir while pouring, and stir until you can see obvious lines when stirring (the muscles are already growing at this time).5
Pour the oil into the batter and continue to stir until the oil is fully dissolved into the batter until the blender is lifted and the batter falls slowly in a thick strip.(After lifting the blender, shake it with your hand, the batter will not break, but it will become very thin and allow light to pass).6
Place a piece of oil paper on a baking sheet and brush it with a layer of oil. Spoon the batter onto the oil paper and scoop it into round cakes. Leave a space between each cookie. After scooping, set the baking sheet aside.7
Heat the oven to 160℃ for 10 minutes.8
Place the baking sheet in the middle layer of the oven and bake for 8 minutes, bake until goose yellow with batter and then out of the oven. The glutinous rice cakes are ready.9
I poured the remaining batter into 3 muffin cups (each cup 1/3 full), placed them in the middle of the oven, and baked for 15 minutes. The glutinous rice muffin bread is ready.Glutinous rice cakes + glutinous rice muffin bread Make Tips
1. Regarding mixing the batter. I used an electric hand mixer with two beaters attached, stirring at low speed. After adding the liquid and mixing well (about 1 minute), switch to medium speed (about 3 minutes).
2. Do not overheat the milk; if it is too hot, it will kill the yeast. The milk is best at around 38°C, warm to the touch but not scalding. After dissolving the yeast in the milk, let it sit for about 5 minutes. So, take this opportunity to mix the eggs into the batter.
3. Regarding self-raising flour. I did not use self-raising flour specifically for cakes, but the ordinary Qi Zi self-raising flour bought from a supermarket. Perhaps because glutinous rice flour was added, the resulting bread had good chewiness and is completely OK.
4. Bake until it turns a pale yellow. Insert a toothpick and then pull it out; if there is no batter sticking to it, it means it is done.
5. Because the batter is very sticky, be sure to grease the mold, otherwise it will be difficult to remove.
6. After pouring the batter into the baking pan, let it sit uncovered for 10 minutes before putting it in the oven. Therefore, the oven does not need to be preheated.
7. You can omit the vanilla powder if you don't have it; of course, you can also use cocoa powder, matcha powder, etc. as a substitute. I used vanilla powder because I wanted to make white treats.